Cloudinary React组件
发布于:2021-02-18 00:02:12
在过去的六个月中,我一直在对React和Cloudinary进行大量试验,这是一个爆炸式的发展-我学到了很多东西,同时还恢复了年轻开发者的野心和渴望。React是一个启示:一个高级的JavaScript框架,它不会使事情复杂化,并鼓励我学习更多ESNext和Babel。Cloudinary让我可以通过修改图像URL对图像和媒体进行出色的处理,例如创建类似Instagram的滤镜,转换图像等。Cloudinary提供了适用于多种不同语言(Node.js,Python,PHP等)的API,但它们又走了一步,现在提供了一 组React组件 供您在React应用中使用!
正在安装 cloudinary-react
Cloudinary的React组件集可通过以下cloudinary-react 名称获得:
yarn add cloudinary-react
# or `npm install cloudinary-react`
使用npm install或yarn add 获取这些组件。
云端组件
Cloudinary提供CloudinaryContext,Image,Video和Transformation组件。它们可在您的应用程序中使用require或进行使用import:
import { Image, Video, Transformation, CloudinaryContext } from 'cloudinary-react';
让我们看看每种组件类型!
图片
该Image 组件是最简单的组件,允许进行所有类型的转换:
<!-- basic usage -->
<Image cloudName="david-wash-blog" publicId="ringo" width="600" crop="scale" alt="Ringo" />

<!-- with a simple effect -->
<Image publicId="ringo" effect="cartoonify:25:50" />
上面的代码转换为:
<img alt="Ringo" width="600" src="http://res.cloudinary.com/david-wash-blog/image/upload/c_scale,w_600/ringo">
请注意,您可以为每个图像添加所有常用属性,例如alt,title等等。
视频
该Video 组件也非常简单,可以按您认为的那样工作:
<Video cloudName="david-wash-blog" publicId="sample-video" width="800" controls />
所有转换也可以应用于视频!
转型
Image 组件可以包含任意数量的 Transformation 组件以修改传出图像:
<!-- Rotate and trim the image, then add text -->
<Image cloudName="david-wash-blog" publicId="ringo">
    <Transformation angle="-45"/>
    <Transformation effect="trim" angle="45" crop="scale" width="600">
        <Transformation overlay="text:Arial_100:Hello" />
    </Transformation>
</Image>
Cloudinary的Transformation文档是出色的转换广度的绝佳参考。如果对如何将转换作为属性添加有任何疑问,请单击Node.js Cloudinary文档示例中的选项卡以查看键和值应为什么。
Cloudinary上下文
该CloudinaryContext 组件允许的媒体和效果的智能分组被应用到其子内容,是它Image,Video,Transformation 组件:
<CloudinaryContext cloudName="david-wash-blog" effect="art:aurora" width="300">
   <Image publicId="ringo"></Image>
   <Image publicId="coffee"></Image>
   <!-- ... -->
</CloudinaryContext>
在上面的示例中,所有Image 组件均具有其父级指定的效果CloudinaryContext,这是一种精简方法,可减少重复的代码并使JSX紧凑而有条理!您甚至可以堆叠CloudinaryContext组件:
<CloudinaryContext cloudName="david-wash-blog">
  <Image publicId="ringo" />
  <Image publicId="coffee" />
  <CloudinaryContext fetchFormat="auto" quality="auto">
    <Image publicId="ringo" />
    <Image publicId="coffee" />
  </CloudinaryContext>
</CloudinaryContext>
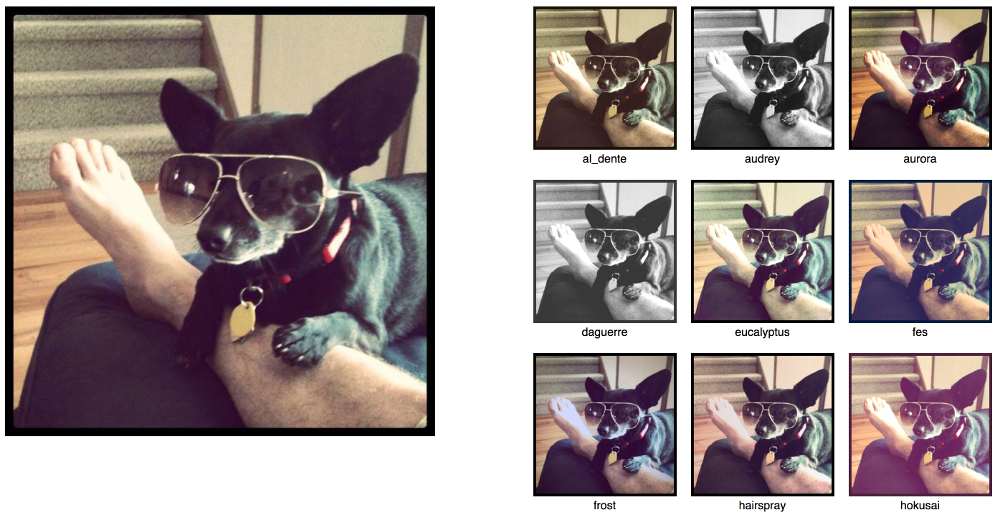
创建一个快速的Instagram风格的实验
我create-react-app之所以喜欢React(尤其是),是因为它可以让我真正快速地构建一个动态应用程序。由于Cloudinary提供了几十个艺术滤镜,我认为使用Cloudinary的React库创建一个非常简单的类似Instagram的应用程序会很有趣。几分钟后,我有了一些东西:
class App extends Component {

  state = { width: 600, filter: null };

  filters = [
    'al_dente', 'audrey', 'aurora', 'daguerre', 'eucalyptus', 'fes', 'frost',
    'hairspray', 'hokusai', 'incognito', 'linen', 'peacock', 'primavera',
    'quartz', 'red_rock', 'refresh', 'sizzle', 'sonnet', 'ukulele', 'zorro'
  ];

  onPreviewClick(event) {
    this.setState({ filter: event.target.src });
  }

  render() {

    return (
      <div>
        <CloudinaryContext cloudName="david-wash-blog">
          <div className="wrapper">
            <div className="left">
              <Image
                publicId="ringo"
                width="{this.state.width}">
                { this.state.filter && (<Transformation effect={`art:${this.state.filter}`} />) }
              </Image>
            </div>
            <div className="right">
              {this.filters.map(filter => (
                <div className="preview" key={filter}>
                  <Image publicId="ringo" width="{this.state.width}" onClick={this.onPreviewClick}>
                    <Transformation effect={`art:${filter}`} />
                  </Image>
                  <span>{filter}</span>
                </div>
              ))}
            </div>
          </div>
        </CloudinaryContext>
      </div>
    );
  }
}
结果看起来像:
Cloudinary为每种主要的编程语言提供API和帮助器,现在提供jQuery和React库资源,使您可以轻松地编写富含媒体的应用程序的代码。Transformation 和CloudinaryContext 组件特别有用,它们可使您的代码保持简洁。 cloudinary-react 这是Cloudinary满足您所有媒体需求的另一个绝佳原因!
作者介绍
