在PHP中构建简单的登录
发布于:2021-02-18 00:02:20
从头开始为您的Web应用程序构建用户身份验证系统可能是一项非常棘手的工作。一开始看起来很简单,但是有很多细节你必须考虑-正确散列密码,保护用户会话,提供一种重置忘记密码的方法。大多数现代框架都提供了处理所有这些问题的样板代码,但即使您没有使用框架,也不要绝望。在本文中,我将向您展示如何从头开始构建一个PHP应用程序(只需依赖一个外部库DotEnv,这样我们就可以将机密存储在代码库外部的.env文件中)。该应用程序将利用Okta简单的OAuth2.0API提供用户登录/注销、新用户注册和“忘记密码”表单。
所有你需要遵循的教程是一个Okta开发人员帐户(你可以免费创建一个),PHP和Composer。
为什么使用Okta进行身份验证?
Okta使身份管理比以前更简单、更安全、更可扩展。Okta是一个API服务,允许您创建、编辑和安全地存储用户帐户和用户帐户数据,并将它们与一个或多个应用程序连接。我们的API使您能够:
对您的用户进行身份验证和授权
存储有关用户的数据
执行基于密码的社交登录
使用多因素身份验证保护您的应用程序
等等!有关更多信息,请查看我们的产品文档
注册一个永久免费的开发人员帐户,完成后,回来学习如何从头开始使用用户身份验证构建PHP应用程序。
创建一个免费的Okta开发者帐户
在继续之前,您需要登录到您的Okta帐户(或者免费创建一个新帐户)并创建一个OAuth应用程序。您需要为应用程序获取客户机ID和客户机机密,还需要一个API令牌,以便应用程序可以远程注册用户。
以下是逐步说明:
转到“应用程序”菜单项并单击“添加应用程序”按钮:

选择Web并单击Next。

输入标题,然后设置http://localhost:8080/作为基本URI和登录重定向URI,然后单击“完成”。您可以保留其余的设置:

从应用程序设置复制客户端ID和客户端机密。
转到API>;令牌,然后单击创建令牌:
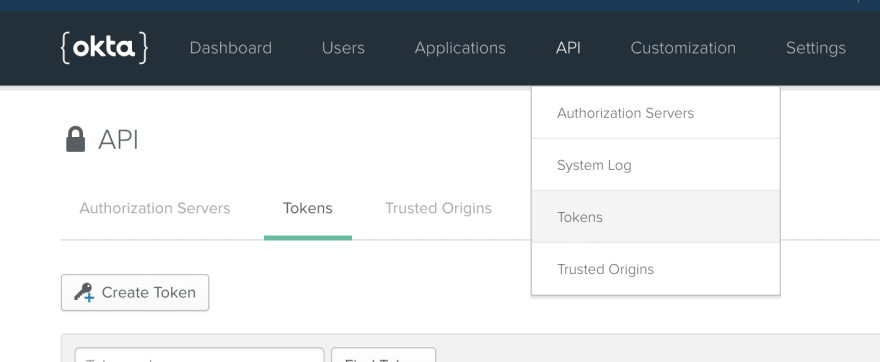
为您的令牌输入一个标题,并确保复制令牌的值并安全地存储它。你只能看到它一次-如果你丢失了它,你需要创建一个新的令牌。
注意你的主要组织URL,你也需要这个。
创建项目骨架
首先在顶层目录中创建一个/src目录和一个简单的composer.json文件,其中只有一个依赖项:DotEnv库,它允许我们将Okta身份验证详细信息保存在代码库外部的.env文件中:
composer.json
{
    "require": {
        "vlucas/phpdotenv": "^2.4"
    },
    "autoload": {
        "psr-4": {
            "Src\": "src/"
        }
    }
}
我们还配置了一个PSR-4自动加载程序,它将自动在/src目录中查找PHP类。
我们现在可以安装依赖项:
composer install
我们有一个/vendor目录,并且安装了DotEnv依赖项(我们也可以使用autoloader从/src加载类,而不需要调用include())。
让我们为我们的项目创建一个.gitignore文件,其中有两行,因此/vendor目录和本地.env文件将被忽略:
/vendor
.env
接下来,我们将为Okta身份验证变量创建一个.env.example文件:
CLIENT_ID=
CLIENT_SECRET=
REDIRECT_URI=http://localhost:8080/
METADATA_URL=https://{yourOktaDomain}/oauth2/default/.well-known/oauth-authorization-server
API_URL_BASE=https://{yourOktaDomain}/api/v1/
API_TOKEN=
以及一个.env文件,我们将在其中填写来自Okta帐户的实际详细信息(Git将忽略它,这样它就不会出现在我们的存储库中)。
项目将具有以下目录结构(您现在可以创建其余文件):
/public/index.php
/src
    /controllers
    /services
    /views
bootstrap.php
.env
.env.example
/public/index.php文件是我们的简单前端控制器。它加载bootstrap.php脚本,然后处理传入的HTTP请求,将其委托给控制器。以下是初始版本:
/public/index.php
<?php
require('../bootstrap.php');

// view data
$data = null;

view('home', $data);
现在,它只是加载没有数据的“home”视图。
bootstrap.php脚本启动自动加载,初始化我们的依赖项(在本例中只有DotEnv),启动会话并提供用于加载视图文件的助手函数view()(我们已经在/public/index.php中使用了它)。以下是bootstrap.php文件的完整版本:
bootstrap.php
<?php
require 'vendor/autoload.php';
use DotenvDotenv;

$dotenv = new DotEnv( __DIR__ );
$dotenv->load();

session_start();

function view($title, $data = null)
{
    $filename = __DIR__. '/src/views/' . $title . '.php';
    if (file_exists($filename)) {
        include($filename);
    } else {
        throw new Exception('View ' . $title . ' not found!');
    }
}
/src/controllers目录保存我们的控制器类。/src/services目录保存服务层的类。/src/views目录保存我们的视图(我们在这个项目中使用简单的PHP视图,没有模板系统)。
让我们开始构建视图:
/src/views/home.php
<?php view('header', $data); ?>
<section class="hero">
    <div class="hero-body">
        <div class="container">

<?php
    if (isset($data['thank_you'])) {
?>
<div class="notification is-info">
<?php
    echo $data['thank_you'];
?>
</div>
<?php
    }
?>

<?php
    if (isset($data['loginError'])) {
?>
<div class="notification is-danger">
<?php
    echo $data['loginError'];
?>
</div>
<?php
    }
?>

<?php
    if (isset($_SESSION['username'])) {
?>
            <p class="subtitle is-4">
            This is some great content for logged in users
            <p>
<?php
    } else {
?>
            <p class="subtitle is-4">
            You need to login to access the content!
            </p>
<?php
    }
?>
        </div>
    </div>
</section>
<?php view('footer'); ?>
homepage视图加载页眉和页脚,并且能够显示通知消息和错误消息。它还根据用户是否登录(通过检查$_SESSION['username']确定)显示不同的内容。
以下是页眉和页脚视图的完整版本:
/src/views/header.php
<!DOCTYPE html>
<html>
    <head>
        <meta charset="utf-8">
        <meta http-equiv="X-UA-Compatible" content="IE=edge">
        <meta name="viewport" content="width=device-width, initial-scale=1">
        <meta name="description" content="PHP Login App bd-index-custom-example">
        <title>Core PHP + Okta Login Example </title>
        <link rel="stylesheet" href="https://cdnjs.cloudflare.com/ajax/libs/bulma/0.7.2/css/bulma.min.css">
    </head>
    <body>
        <nav id="navbar" class="navbar has-shadow is-spaced">
            <div>
            <div>
                <h1>Core PHP + Okta Login Example</h1>
                <?php
                    if (isset($_SESSION['username'])) {
                ?>
                        <p>
                            Logged in as <?php echo $_SESSION['username'] ?>
                        </p>
                        <p><a href="/?logout">Log Out</a></p>
                <?php
                    } else {
                ?>
                        <p>Not logged in</p>
                        <p><a href="/?login">Log In</a> | <a href="/?forgot">Forgot Password</a> | <a href="/?register">Register</a></p>
                <?php
                    }
                ?>
            </div>
            </div>
        </nav>


/src/views/footer.php

   </body>
</html>
头部加载bulmacss框架,如果有登录用户,则显示用户名和注销链接;如果没有登录用户,则显示登录/忘记密码/注册链接。
启动内置PHP服务器:
php -S 127.0.0.1:8080 -t public
加载时http://localhost:8080,您应该看到应用程序:

实施Okta登录/注销
Okta登录分为几个阶段:
建立登录URL
重定向到URL
远程执行Okta身份验证,然后重定向回我们的重定向URI
处理响应并授权应用程序中的用户。
我们将public/index.php修改为处理上面的步骤1和步骤2,并将其添加到view('home');行的上方:
// build login URL and redirect the user
if (isset($_REQUEST['login']) && (! isset($_SESSION['username']))) {
    $_SESSION['state'] = bin2hex(random_bytes(5));
    $authorizeUrl = $oktaApi->buildAuthorizeUrl($_SESSION['state']);
    header('Location: ' . $authorizeUrl);
    die();
}
当它收到重定向回(包括来自Okta的代码)时,还要处理步骤4:
if (isset($_GET['code'])) {
    $result = $oktaApi->authorizeUser();
    if (isset($result['error'])) {
        $data['loginError'] = $result['errorMessage'];
    }
}
我们还将添加一个非常简单的注销处理程序,它只是取消设置会话变量username。
新版本如下:
/public/index.php
<?php
require('../bootstrap.php');

use SrcServicesOktaApiService;

$oktaApi = new OktaApiService;

// view data
$data = null;

// build login URL and redirect the user
if (isset($_REQUEST['login']) && (! isset($_SESSION['username']))) {
    $_SESSION['state'] = bin2hex(random_bytes(5));
    $authorizeUrl = $oktaApi->buildAuthorizeUrl($_SESSION['state']);
    header('Location: ' . $authorizeUrl);
    die();
}

// handle the redirect back
if (isset($_GET['code'])) {
    $result = $oktaApi->authorizeUser();
    if (isset($result['error'])) {
        $data['loginError'] = $result['errorMessage'];
    }
}

if (isset($_REQUEST['logout'])) {
    unset($_SESSION['username']);
    header('Location: /');
    die();
}

view('home', $data);
我们还要构建OktaApiService并添加所需的方法(buildAuthorizeUrl()和authorizeUser()):
/src/services/OktaApiService.php
<?php
namespace SrcServices;

class OktaApiService
{
    private $clientId;
    private $clientSecret;
    private $redirectUri;
    private $metadataUrl;
    private $apiToken;
    private $apiUrlBase;

    public function __construct()
    {
        $this->clientId = getenv('CLIENT_ID');
        $this->clientSecret = getenv('CLIENT_SECRET');
        $this->redirectUri = getenv('REDIRECT_URI');
        $this->metadataUrl = getenv('METADATA_URL');
        $this->apiToken = getenv('API_TOKEN');
        $this->apiUrlBase = getenv('API_URL_BASE');
    }

    public function buildAuthorizeUrl($state)
    {
        $metadata = $this->httpRequest($this->metadataUrl);
        $url = $metadata->authorization_endpoint . '?' . http_build_query([
            'response_type' => 'code',
            'client_id' => $this->clientId,
            'redirect_uri' => $this->redirectUri,
            'state' => $state,
        ]);
        return $url;
    }

    public function authorizeUser()
    {
        if ($_SESSION['state'] != $_GET['state']) {
            $result['error'] = true;
            $result['errorMessage'] = 'Authorization server returned an invalid state parameter';
            return $result;
        }

        if (isset($_GET['error'])) {
            $result['error'] = true;
            $result['errorMessage'] = 'Authorization server returned an error: '.htmlspecialchars($_GET['error']);
            return $result;
        }

        $metadata = $this->httpRequest($this->metadataUrl);

        $response = $this->httpRequest($metadata->token_endpoint, [
            'grant_type' => 'authorization_code',
            'code' => $_GET['code'],
            'redirect_uri' => $this->redirectUri,
            'client_id' => $this->clientId,
            'client_secret' => $this->clientSecret
        ]);

        if (! isset($response->access_token)) {
            $result['error'] = true;
            $result['errorMessage'] = 'Error fetching access token!';
            return $result;
        }
        $_SESSION['access_token'] = $response->access_token;

        $token = $this->httpRequest($metadata->introspection_endpoint, [
            'token' => $response->access_token,
            'client_id' => $this->clientId,
            'client_secret' => $this->clientSecret
        ]);

        if ($token->active == 1) {
            $_SESSION['username'] = $token->username;
            $result['success'] = true;
            return $result;
        }
    }

    private function httpRequest($url, $params = null)
    {
        $ch = curl_init($url);
        curl_setopt($ch, CURLOPT_RETURNTRANSFER, true);
        if ($params) {
            curl_setopt($ch, CURLOPT_POSTFIELDS, http_build_query($params));
        }
        return json_decode(curl_exec($ch));
    }
}
在OktaApiService类中发生了很多事情,让我来解释一下这个过程:
在构建授权URL之前,我们生成一个随机值,用于验证响应:
$_SESSION['state'] = bin2hex(random_bytes(5));
$authorizeUrl = $oktaApi->buildAuthorizeUrl($_SESSION['state']);
方法buildAuthorizeUrl()使用对元数据URL的调用来获取服务器的授权端点,然后为该端点构建查询:
       $metadata = $this->httpRequest($this->metadataUrl);
        $url = $metadata->authorization_endpoint . '?' . http_build_query([
            'response_type' => 'code',
            'client_id' => $this->clientId,
            'redirect_uri' => $this->redirectUri,
            'state' => $state,
        ]);
当我们得到重定向回,我们收到的状态变量,我们发送的授权重定向和代码从Okta。当我们得到一个代码时,我们调用authorizeUser()方法,首先验证状态值是否匹配并且响应中没有错误代码:
       if ($_SESSION['state'] != $_GET['state']) {
            $result['error'] = true;
            $result['errorMessage'] = 'Authorization server returned an invalid state parameter';
            return $result;
        }

        if (isset($_GET['error'])) {
            $result['error'] = true;
            $result['errorMessage'] = 'Authorization server returned an error: '.htmlspecialchars($_GET['error']);
            return $result;
        }
然后使用token_endpoint(来自元数据调用)将代码交换为访问令牌:
       $metadata = $this->httpRequest($this->metadataUrl);

        $response = $this->httpRequest($metadata->token_endpoint, [
            'grant_type' => 'authorization_code',
            'code' => $_GET['code'],
            'redirect_uri' => $this->redirectUri,
            'client_id' => $this->clientId,
            'client_secret' => $this->clientSecret
        ]);

        if (! isset($response->access_token)) {
            $result['error'] = true;
            $result['errorMessage'] = 'Error fetching access token!';
            return $result;
        }
        $_SESSION['access_token'] = $response->access_token;
之后,我们使用内省端点来确认令牌有效且处于活动状态,并获取新授权用户的用户名:
       $token = $this->httpRequest($metadata->introspection_endpoint, [
            'token' => $response->access_token,
            'client_id' => $this->clientId,
            'client_secret' => $this->clientSecret
        ]);

        if ($token->active == 1) {
            $_SESSION['username'] = $token->username;
            $result['success'] = true;
            return $result;
        }
通过Okta API注册新用户
新用户注册将在UserController类中处理。前面的控制器需要三个处理器:
public/index.php
...
use SrcControllersUserController;
...
$userController = new UserController($oktaApi);
...
if (isset($_REQUEST['register'])) {
    view('register');
    die();
}

if (isset($_REQUEST['command']) && ($_REQUEST['command'] == 'register')) {
    $userController->handleRegistrationPost();
    die();
}

if (isset($_REQUEST['thankyou'])) {
    $data['thank_you'] = 'Thank you for your registration!';
}
...
单击寄存器链接时,第一个处理程序只加载register视图:
/src/views/register.php
<?php view('header', $data); ?>
<section class="hero">
    <div class="hero-body">
        <div class="container">
            <form method="post" action="/">

<?php
    if ($data && $data['errors']) {
?>
<div class="notification is-danger">
<?php
    echo "Errors:";
    echo $data['errorMessage'];
?>
</div>
<?php
    }
?>

<div class="field">
    <label class="label">First Name</label>
    <div class="control">
        <input class="input" name="first_name" type="text" value="<?php if ($data) { echo $data['input']['first_name']; } ?>">
    </div>
</div>

<div class="field">
    <label class="label">Last Name</label>
    <div class="control">
        <input class="input" name="last_name" type="text" value="<?php if ($data) { echo $data['input']['last_name']; } ?>">
    </div>
</div>

<div class="field">
    <label class="label">Email</label>
    <div class="control">
        <input class="input" name="email" type="email" value="<?php if ($data) { echo $data['input']['email']; } ?>">
    </div>
</div>

<div class="field">
    <label class="label">Password</label>
    <div class="control">
        <input class="input" name="password" type="password" value="">
    </div>
</div>

<div class="field">
    <label class="label">Repeat Password</label>
    <div class="control">
        <input class="input" name="repeat_password" type="password" value="">
    </div>
</div>

<input type="hidden" name="command" value="register">

<div class="control">
    <button class="button is-link">Register</button>
    <a class="button is-link" href="/">Cancel</a>
</div>

            </form>
        </div>
    </div>
</section>
<?php view('footer'); ?>
提交表单时,第二个处理程序将委托给用户控制器:
/src/controllers/UserController.php
<?php
namespace SrcControllers;

use SrcServicesOktaApiService;

class UserController
{

    private $errors = null;
    private $errorMessage = null;

    public function __construct(OktaApiService $oktaApi)
    {
        $this->oktaApi = $oktaApi;
    }

    public function handleRegistrationPost()
    {
        if ($_SERVER['REQUEST_METHOD'] === 'POST') {

            $input = [
                'first_name' => $_POST['first_name'],
                'last_name' => $_POST['last_name'],
                'email' => $_POST['email'],
                'password' => $_POST['password'],
                'repeat_password' => $_POST['repeat_password'],
            ];

            // local form validation
            $this->validateRegistrationForm($input);
            if ($this->errors) {
                $viewData = [
                    'input' => $input,
                    'errors' => $this->errors,
                    'errorMessage' => $this->errorMessage
                ];
                view('register', $viewData);
                return true;
            }

            // if local validation passes, attempt to register the user
            // via the Okta API
            $result = $this->oktaApi->registerUser($input);
            $result = json_decode($result, true);
            if (isset($result['errorCode'])) {
                $viewData = [
                    'input' => $input,
                    'errors' => true,
                    'errorMessage' => '<br>(Okta) ' . $result['errorCauses'][0]['errorSummary']
                ];
                view('register', $viewData);
                return true;
            }

            header('Location: /?thankyou');
            return true;
        }

        header('HTTP/1.0 405 Method Not Allowed');
        die();
    }

    private function validateRegistrationForm($input)
    {
        $errorMessage = '';
        $errors = false;

        // validate field lengths
        if (strlen($input['first_name']) > 50) {
            $errorMessage .= "<br>'First Name' is too long (50 characters max)!";
            $errors = true;
        }
        if (strlen($input['last_name']) > 50) {
            $errorMessage .= "<br>'Last Name' is too long (50 characters max)!";
            $errors = true;
        }
        if (strlen($input['email']) > 100) {
            $errorMessage .= "<br>'Email' is too long (100 characters max)!";
            $errors = true;
        }
        if (strlen($input['password']) > 72) {
            $errorMessage .= "<br>'Password' is too long (72 characters max)!";
            $errors = true;
        }
        if (strlen($input['password']) < 8) {
            $errorMessage .= "<br>'Password' is too short (8 characters min)!";
            $errors = true;
        }

        // validate field contents
        if (empty($input['first_name'])) {
            $errorMessage .= "<br>'First Name' is required!";
            $errors = true;
        }
        if (empty($input['last_name'])) {
            $errorMessage .= "<br>'Last Name' is required!";
            $errors = true;
        }
        if (empty($input['email'])) {
            $errorMessage .= "<br>'Email' is required!";
            $errors = true;
        } else if (! filter_var($input['email'], FILTER_VALIDATE_EMAIL)) {
            $errorMessage .= "<br>Invalid email!";
            $errors = true;
        }
        if (empty($input['password'])) {
            $errorMessage .= "<br>'Password' is required!";
            $errors = true;
        }
        if (empty($input['repeat_password'])) {
            $errorMessage .= "<br>'Repeat Password' is required!";
            $errors = true;
        }
        if ($input['password'] !== $input['repeat_password']) {
            $errorMessage .= "<br>Passwords do not match!";
            $errors = true;
        }

        $this->errors = $errors;
        $this->errorMessage = $errorMessage;
    }
}
我们还需要将新方法registerUser()添加到OktaApiService类:
/src/services/OktaApiService.php
...
   public function registerUser($input)
    {
        $data['profile'] = [
            'firstName' => $input['first_name'],
            'lastName' => $input['last_name'],
            'email' => $input['email'],
            'login' => $input['email']
        ];
        $data['credentials'] = [
            'password' => [
                'value' => $input['password']
            ]
        ];
        $data = json_encode($data);

        $ch = curl_init($this->apiUrlBase . 'users');
        curl_setopt($ch, CURLOPT_CUSTOMREQUEST, "POST");
        curl_setopt($ch, CURLOPT_POSTFIELDS, $data);
        curl_setopt($ch, CURLOPT_RETURNTRANSFER, true);
        curl_setopt($ch, CURLOPT_HTTPHEADER, [
            'Accept: application/json',
            'Content-Type: application/json',
            'Content-Length: ' . strlen($data),
            'Authorization: SSWS ' . $this->apiToken
        ]);

        return curl_exec($ch);
    }
...
注册成功后,第三个处理程序只在仪表板上显示一条消息“感谢您的注册”。
表单如下所示,代码包括验证和错误处理(屏幕截图显示提交空表单后的输出):

如果转到用户>人员,您可以在Okta管理面板中看到新用户。
通过Okta API忘记密码
“忘记密码”功能将遵循相同的模式:
/public/index.php中的新处理程序:
...

if (isset($_REQUEST['forgot'])) {
    view('forgot');
    die();
}

if (isset($_REQUEST['command']) && ($_REQUEST['command'] == 'forgot_password')) {
    $userController->handleForgotPasswordPost();
    die();
}

if (isset($_REQUEST['password_reset'])) {
    $data['thank_you'] = 'You should receive an email with password reset instructions';
}
...
单击忘记密码链接时,第一个处理程序加载forgot视图:
/src/views/forgot.php
<?php view('header', $data); ?>
<section class="hero">
    <div class="hero-body">
        <div class="container">
            <form method="post" action="/">

<?php
    if ($data && $data['errors']) {
?>
<div class="notification is-danger">
<?php
    echo "Errors:";
    echo $data['errorMessage'];
?>
</div>
<?php
    }
?>

<div class="field">
    <label class="label">Email</label>
    <div class="control">
        <input class="input" name="email" type="email" value="<?php if ($data) { echo $data['input']['email']; } ?>">
    </div>
</div>

<input type="hidden" name="command" value="forgot_password">

<div class="control">
    <button class="button is-link">Reset Password</button>
    <a class="button is-link" href="/">Cancel</a>
</div>

            </form>
        </div>
    </div>
</section>
<?php view('footer'); ?>
提交表单时,第二个处理程序将委托给用户控制器:
/src/controllers/UserController.php
...   public function handleForgotPasswordPost()    {       if ($_SERVER['REQUEST_METHOD'] === 'POST') {            $input = [                'email' => $_POST['email']            ];            // validate the email address            if (empty($input['email']) ||                strlen($input['email']) > 100 ||                (! filter_var($input['email'], FILTER_VALIDATE_EMAIL))) {                $viewData = [                    'input' => $input,                    'errors' => true,                    'errorMessage' => '
Invalid email!'                ];                view('forgot', $viewData);                return true;            }            // search for this user via the OktaApi            $result = $this->oktaApi->findUser($input);            $result = json_decode($result, true);            if (! isset($result[0]['id'])) {                $viewData = [                    'input' => $input,                    'errors' => true,                    'errorMessage' => '
User not found!'                ];                view('forgot', $viewData);                return true;            }            // attempt to send a reset link to this user            $userId = $result[0]['id'];            $result = $this->oktaApi->resetPassword($userId);            header('Location: /?password_reset');            return true;        }        header('HTTP/1.0 405 Method Not Allowed');        die();    } ...
控制器使用来自OktaApiService的两种新方法:findUser()和resetPassword():
/src/services/OktaApiService.php
...
   public function findUser($input)
    {
        $url = $this->apiUrlBase . 'users?q=' . urlencode($input['email']) . '&limit=1';
        $ch = curl_init($url);
        curl_setopt($ch, CURLOPT_RETURNTRANSFER, true);
        curl_setopt($ch, CURLOPT_HTTPHEADER, [
            'Accept: application/json',
            'Content-Type: application/json',
            'Authorization: SSWS ' . $this->apiToken
        ]);

        return curl_exec($ch);
    }

    public function resetPassword($userId)
    {
        $url = $this->apiUrlBase . 'users/' . $userId . '/lifecycle/reset_password';

        $ch = curl_init($url);
        curl_setopt($ch, CURLOPT_CUSTOMREQUEST, "POST");
        curl_setopt($ch, CURLOPT_POSTFIELDS, []);
        curl_setopt($ch, CURLOPT_RETURNTRANSFER, true);
        curl_setopt($ch, CURLOPT_HTTPHEADER, [
            'Accept: application/json',
            'Content-Type: application/json',
            'Authorization: SSWS ' . $this->apiToken
        ]);

        return curl_exec($ch);
    }
...
第三个处理程序在触发重置过程后在仪表板上显示一条消息。
申请已经完成了。您可以在Okta授权服务器中注册新用户,在Web应用程序中对其进行授权,并远程触发“重置密码”例程。
像往常一样,如果你有任何问题,评论,或对这篇文章的关注,请随时在下面留下评论。
作者介绍
